Plan Your Design Sequence For Machine Embroidery
Planning your design sequence for machine embroidery is very important for a smooth project. First, you should have a clear idea of what you want to create. Start by drawing your design on paper with simple shapes and clear lines. Then, scan your drawing into a computer so you can work on it digitally. Next, use a special program to convert your drawing into a digital file that the machine can read. You must plan the order in which the stitches are made.
This careful order helps the machine stitch correctly without overlapping or missing parts. You can adjust the size of your design by using an embroidery size chart to ensure it fits your fabric perfectly. A good plan makes the project easier and leads to a neat design. Taking time to plan your sequence will make your machine embroidery project successful.
1. Start With A Clear Idea
The first step is to have a clear idea of your design. Before you begin, think about what picture or pattern you want to stitch. Ask yourself questions like:
- What shapes do I want to use?
- Which colors do I like?
- What story should my design tell?
A clear idea is like having a map that guides you through your project. When you know what you want to create, it is easier to plan the order in which the stitches will go. Write down your ideas or draw a rough sketch on a piece of paper.
2. Draw And Prepare Your Artwork
Once you have your idea, the next step is to draw your design. Use a pencil and paper to make a neat drawing. It is best to use simple lines and clear shapes. This drawing will be the basis for your machine embroidery designs.
When you finish your drawing, check it carefully. Erase any extra lines or mistakes. A clean drawing helps you later when you convert your artwork into a digital file. Remember, a neat drawing makes it easier to sequence your design properly.
3. Digitize Your Artwork
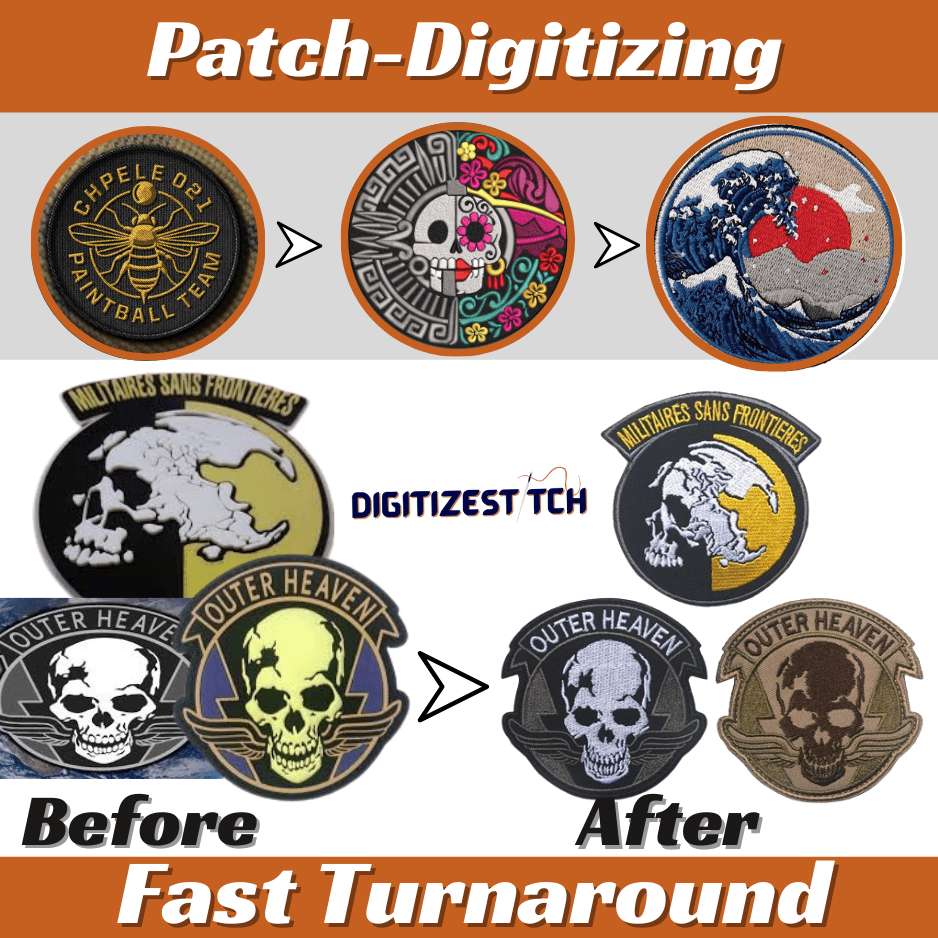
The next step is to digitize your drawing. Digitizing means changing your drawing into a digital file that your embroidery machine can read. You can use computer programs made for this purpose. These programs help you trace your drawing and set the order of stitches.
If you find digitizing difficult, you can get help from embroidery digitizing services USA. These experts know how to turn your drawing into a perfect digital file. They make sure that every line and curve is right for the embroidery machine. With their help, your design will be ready for the next step—sequencing.
4. Understand The Order Of Stitches
Sequencing your design means deciding the order in which the machine will stitch each part of your design. This step is very important because the order can change how your design looks. If the stitches are not in the right order, some parts of your design might cover other parts, or the colors may mix in a way you do not like.
Think about your design and imagine how you want the embroidery to be built. Start with the outline, then fill in the details. For example, if you are making a flower, you might start with the outer petals, then move to the inner petals, and finally stitch the center of the flower.
5. Use An Embroidery Size Chart
An embroidery size chart is a helpful tool that shows you the best size for your design on different items. When you plan your design, it is important to know how big your design should be on a T-shirt, hat, bag, or any other item.
Using the embroidery size chart, you can:
- Find the right measurements for your design.
- Adjust your design to fit on different items.
- Make sure that no details are lost when your design is stitched.
Check the embroidery size chart after digitizing your artwork. If your design looks too big or too small, you can change its size in the computer program. This simple tool helps you create machine embroidery designs that always look good on any fabric.
6. Plan Your Stitching Sequence
Now that you have your digital file and know the right size from the embroidery size chart, it is time to plan the stitching sequence. Here are some tips for sequencing your design:
Start With The Outline
Begin by stitching the outer edge of your design. This creates a clear border.
Move To The Details
After the outline, add the smaller details inside. These could be shapes, patterns, or letters.
Fill In The Colors
Finally, fill in the areas with color. This order helps prevent the machine from overlapping stitches in a way that might ruin your design.
Write down your plan or draw a small diagram. This will remind you of the order in which you want the machine to work. Planning the sequence carefully makes your design look perfect when stitched.
7. Test Your Design On A Sample
Before stitching your design on the final item, it is a good idea to test it on a small piece of fabric. Testing helps you see if the sequence of stitches works as you planned. Here’s how you can test your design:
Choose A Small Fabric Sample
Pick a piece of fabric for your final project.
Load Your Digital File
Put your digital file into the embroidery machine.
Stitch A Sample
Run the machine to stitch your design onto the fabric sample.
Check The Order
Look at the sample carefully. Are the stitches in the right order? Do the colors fill in correctly? Are there any mistakes?
If you find any problems, go back to your digital file and adjust the sequence. Testing is a simple but important step that helps you fix mistakes before you work on the final project.
8. Practice And Learn From Each Project
Learning to sequence your designs well takes time and practice. Every project you work on teaches you something new. Even if your first design does not come out perfectly, you can learn and improve. Here are some tips for practicing:
Practice Regularly
The more you practice, the better you will become at sequencing.
Study Other Machine Embroidery Designs
Look at examples of good machine embroidery designs. Notice how the stitch order makes the design look neat.
Ask For Feedback
Show your work to friends, family, or teachers. They might have helpful suggestions.
Keep A Journal
Write down what worked and what did not. This will help you remember good ideas for next time.
With practice, you will find that planning and sequencing become easier. Soon, you will be able to create stunning machine embroidery designs with a clear, organized stitch order.
9. Use Embroidery Digitizing Services USA For Expert Help
Sometimes, you might need a little extra help with digitizing or sequencing your design. That is where embroidery digitizing services USA come in. These experts can:
- Turn your drawing into a perfect digital file.
- Help you set the correct stitch order.
- Make sure your design is ready for the embroidery machine.
If you are not sure about a part of your design or need advice on sequencing, consider reaching out to these services. They can help you fix any problems and make your design even better. Using professional help can save you time and ensure that your final project looks amazing.
10. Organize Your Files And Tools
Keeping your work organized is very important. When you work on machine embroidery designs, you will have many files and tools. Here are some ways to stay organized:
Create Folders On Your Computer
Save your digital files in folders labeled with the project name and date.
Label Your Tools
Keep your scissors, needles, threads, and other tools in one place.
Keep A Project Notebook
Write down your design ideas, sequencing plans, and any changes you make. This notebook will help you remember what works best.
Use An Embroidery Size Chart Regularly
Always check the embroidery size chart to make sure your design is the right size for each project.
An organized workspace makes it easier to focus on your creative work. It also helps you quickly find the tools or files you need, so you can spend more time designing and less time searching.
11. Explore New Ideas And Techniques
The world of machine embroidery is full of creative ideas. Never stop exploring new techniques and styles. Here are some ways to learn more:
Watch Online Tutorials
Many videos show how to sequence designs and use embroidery machines.
Join Online Groups
Find communities of people who love machine embroidery designs. Sharing ideas can spark new creativity.
Visit Craft Fairs Or Workshops
Sometimes local events offer classes where you can learn new skills.
Read Books And Blogs
Look for simple guides that explain different sequencing techniques.
By exploring new ideas, you will find new ways to make your designs even more interesting. The more you teach, the more creative you can be with your machine embroidery designs.